Welcome to UndoLooper. This manual gets you from install to your first beat fast, then shows you the tricks that make it fun: layering a groove, chopping drums onto pads, and using undo and redo to drop a song back to the verse and slam the chorus back in.
It’s written for the Windows version, 1.3.0. The Mac and iPad versions use the same pedal and the same undo ideas. SLICE and the one-hit pads are in the Windows version for now.
Jump to: Set up · The pedal · Your first loop · Make a beat · Pads · SLICE · Verse and chorus · Foot control · Save and share · Free and full · Troubleshooting · Cheat sheet
Set up in five minutes
Install
Run the installer and choose the app, the VST3 plugin, or both. The app shows up in your Start menu. The plugin goes into the standard VST3 folder, so your DAW finds it after a plugin rescan.
Get sound in and out (standalone app)
Click Options in the top left corner of the window, then open the audio settings.
- Audio device type: pick ASIO if your audio interface has an ASIO driver. It’s the fastest, tightest option on Windows.
- Device: pick your interface.
- Active input channels: tick the input your mic or guitar is plugged into. Tick your speaker or headphone outputs under output channels.
- Audio buffer size: 64 or 128 samples feels instant. If you hear crackles, go up a step.
- Untick “Mute audio input.” It’s ticked the first time you open the app, and while it’s on you won’t hear your mic at all. Use headphones or keep your speakers down so the mic doesn’t feed back.
- Active MIDI inputs: tick your foot controller or pad controller if you have one.
Say something into the mic. If you hear yourself, you’re ready.
In a DAW
Put UndoLooper on an audio track with your mic or guitar as the input, and turn on input monitoring for that track. Everything you hear, your live sound plus the loop, comes out of UndoLooper. You can run more than one instance side by side, each on its own track.
A quick tour of the pedal
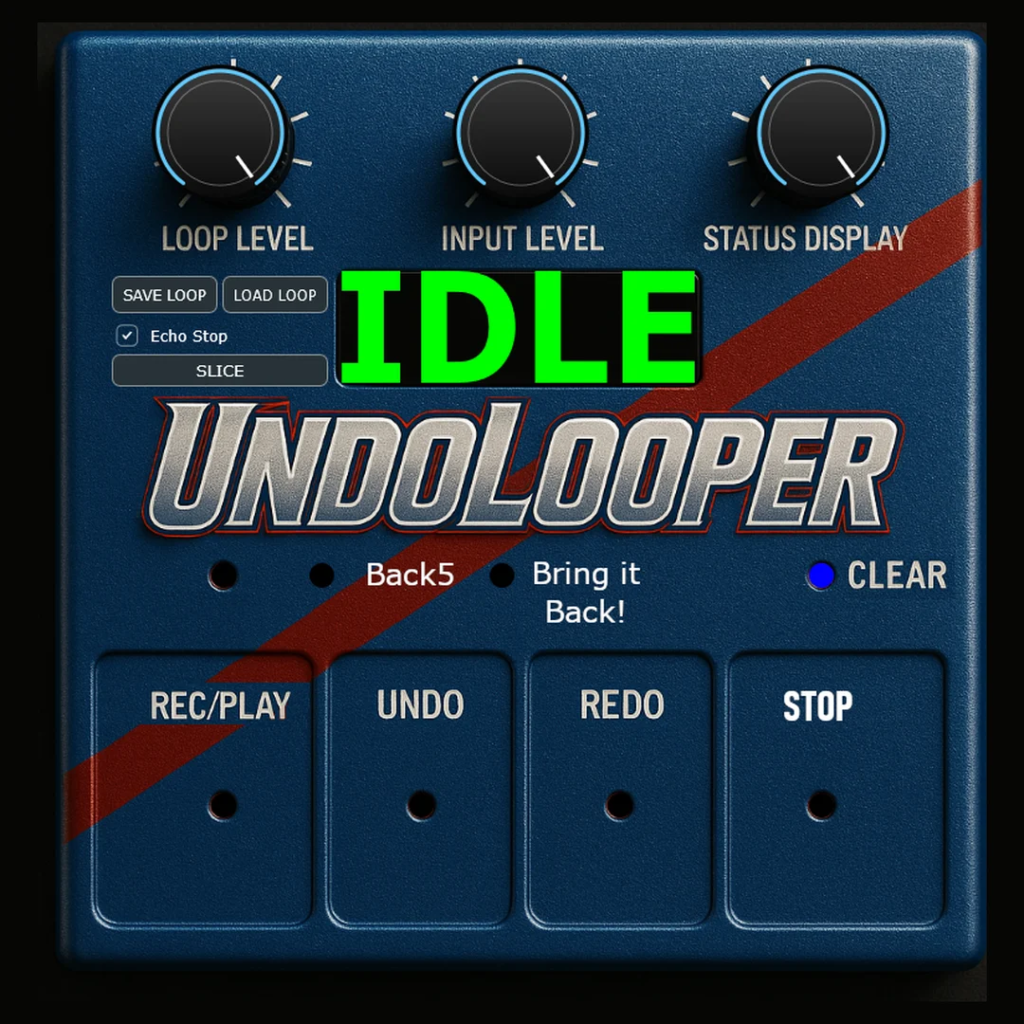
UndoLooper looks like a pedal because it’s meant to be played like one. Here’s what everything does.
The four big switches
- REC/PLAY: press once to start recording, again to close the loop and play it, again to record a new layer on top (overdub), and again to finish that layer.
- UNDO: takes off the last layer.
- REDO: puts it back.
- STOP: tap to stop the loop. Hold it for two seconds to clear everything and start fresh.
The row above them
- Back5: takes off five layers at once. Great for a quick breakdown.
- Bring it Back!: puts back every layer you took off, in one press.
- CLEAR: wipes the loop and its history right away. Use it when you’re sure.
Knobs, display and the rest
- LOOP LEVEL: how loud the loop plays back.
- INPUT LEVEL: how loud your live sound is, both what you hear and what gets recorded.
- STATUS DISPLAY: the brightness of the big green display. Turn it down on a dark stage.
- The display tells you what just happened: REC, PLAY, DUB, UNDO and so on. The full list is in the cheat sheet.
- The diamond to the right of the display traces your loop, one lap per pass, so you can see where beat one is coming.
- The light on REC/PLAY is red while recording, green while playing and orange while you’re overdubbing.
- SAVE LOOP and LOAD LOOP save and open your loops. See Save and share.
- Echo Stop: when it’s ticked, STOP lets the loop fade out with a short echo instead of cutting off dead.
- SLICE: cut a loop out of any sound file. See SLICE.
- The pads along the bottom are eight one-hit sounds you can play and record. See Pads.
Your first loop
- Count yourself in and press REC/PLAY right on beat one. The display says REC.
- Play your part. Two or four bars is plenty.
- Press REC/PLAY again right on the next beat one. The loop starts playing and the display says PLAY. That second press sets the length of the loop, so land it on the downbeat.
- Press REC/PLAY to add a layer. The display says DUB. Play something new, then press REC/PLAY again to finish the layer.
- Don’t like it? Press UNDO. Changed your mind? Press REDO.
That’s the whole loop. A few things worth knowing early:
- A layer can go around the loop as many times as you like. Everything until you press REC/PLAY again is one layer, so one UNDO takes it all off.
- Messed up in the middle of a layer? Press UNDO while you’re still recording it and that take just disappears.
- If the loop bumps or skips at the end, the closing press was a little early or late. Hold STOP for two seconds to clear and try again, or trim the loop in SLICE.
Make a beat
You don’t need a drum machine. Here are three ways to get a groove going, from no gear at all to chopping up a drum break.
Recipe 1: beatbox it
- Kick and snare. Record a simple pattern with your mouth: kick on beats one and three, snare on two and four. Get close to the mic for the kick. Close the loop.
- Hi-hats. Overdub short “ts” sounds on every eighth note. Back off the mic a little so they sit on top instead of swamping the kick.
- Bass. Overdub a low hum or “dum dum” bass line. Two notes is enough.
- The hook. Add a melody, a guitar riff or a vocal line on top.
Record in the order you want to peel things away later: the foundation first, the flashy stuff last. That makes the verse and chorus trick work perfectly.
Recipe 2: build it from pads
- Put a kick on pad 1, a snare on pad 2 and a hi-hat on pad 3. Click an empty pad to pick a file, or drag several files onto pad 1 and they fill the pads in order.
- Map them to something you can hit: right-click a pad, then hit a pad on your MIDI controller. In the standalone app you can press a computer key instead. The display says LEARNED.
- Make sure TO LOOP is ticked (it is when you start). Press REC/PLAY, play your pattern on the pads, and close the loop.
- Overdub more hits, an extra snare, an open hat, a clap. Each pass is its own layer you can undo.
Recipe 3: start from a drum break
Got a drum loop or a song section you love? Click SLICE, open the file, and cut out exactly the bars you want. It becomes your first loop and you play on top of it. The details are in the SLICE section.
Then chop single hits out of the same break and send them to the pads, so you can play the break’s own kick and snare live over the loop.
The one-hit pads
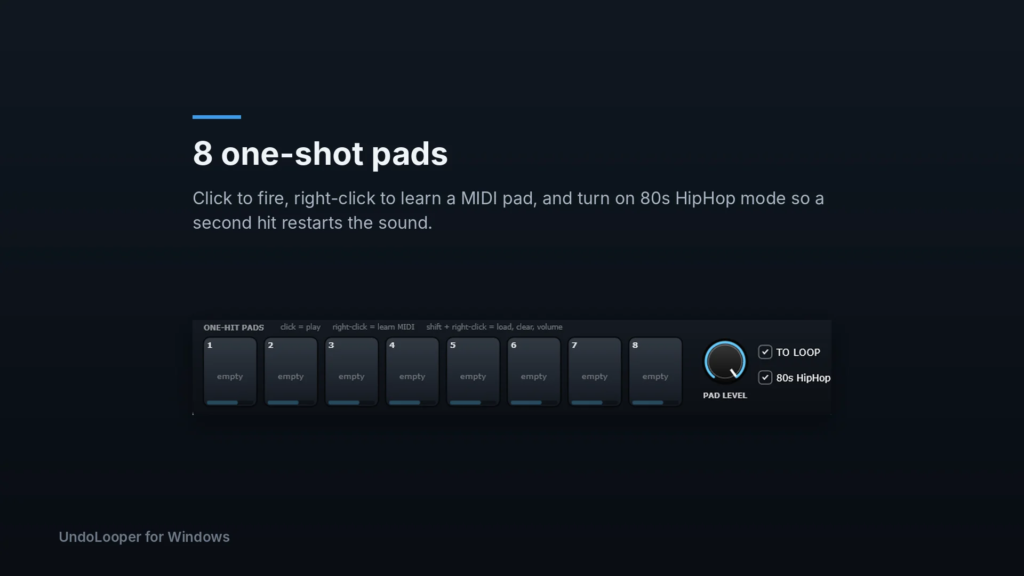
Eight pads sit under the pedal. Load anything on them: drums, a vocal shout, a horn stab, an air horn if you must.
- Load a sound: click an empty pad, or drag files onto a pad. Dropping several files fills the next pads in order. Sounds longer than 60 seconds are cut to the first 60.
- Play it: click the pad, hit its mapped MIDI pad, or press its key in the standalone app. MIDI hits land right on time, even with the plugin window closed in a DAW.
- Map it: right-click the pad, then hit a MIDI pad, key or note. The pad pulses while it waits.
- More options: Shift + right-click a pad to load a new sound, clear the pad, clear its mapping, or set its volume. You can also roll the mouse wheel over a pad to change its volume.
- PAD LEVEL: the overall volume of all eight pads.
- TO LOOP: when ticked, the pads go into the looper like your mic does, so they get recorded. Untick it to play the pads on top without recording them. That’s handy for live fills and drops.
80s HipHop mode
Normally every hit plays all the way through, and quick repeat hits ring over each other. Tick 80s HipHop and hitting a pad that’s still playing cuts it off and starts it again from the top, like the old samplers. Load a vocal shout or a stab and hit it fast for that “fr-fr-fresh” stutter. A hit you leave alone still plays to the end, and one pad never cuts off another.
Your pad sounds, volumes and mappings are saved with your session. If a sound file gets moved or deleted, its pad shows “missing.”
SLICE: cut the perfect loop
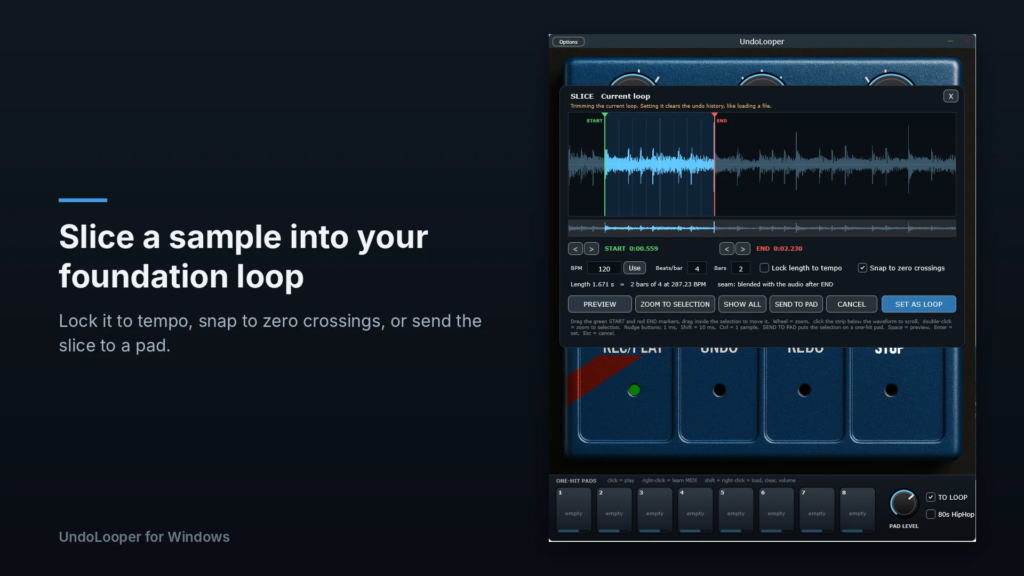
SLICE lets you pick the exact piece of a sound file to loop, so it sits right on the beat. Click SLICE under Echo Stop. If nothing is loaded, it asks for a file. If a loop is already going, SLICE opens on that loop so you can trim it. To slice a different file, open it with LOAD LOOP or drop it on the window first, then click SLICE. Audio files longer than 60 seconds open in SLICE on their own.
- Find the start. Drag the green START marker to the first kick of the bar you want. Roll the mouse wheel to zoom in, and use the strip under the waveform to scroll.
- Set the length. If you know the tempo, type the BPM, beats per bar and number of bars, then tick Lock length to tempo. The loop is now exactly that many bars and only START moves. If you don’t know the tempo, leave the lock off and drag the red END marker to where the loop should come around. The panel shows the tempo your selection works out to, and Use copies it into the BPM box.
- Listen. Press PREVIEW (or the space bar) to hear it loop while you adjust. What you hear is exactly what you’ll get.
- Fine-tune. The < and > buttons nudge a marker by 1 ms. Hold Shift for 10 ms, or Ctrl for a single sample. Tick Snap to zero crossings to help avoid clicks.
- Set it. Press SET AS LOOP (or Enter). It replaces your current loop and its undo history, then you’re off and overdubbing.
Chop hits onto the pads
Select a single hit, like one kick, and press SEND TO PAD. The pedal dims and the pads light up. Click the pad you want, or press 1 to 8. The next empty pad is outlined in green, and pads that already have a sound say “replace.” Esc cancels.
The SLICE panel stays open, so you can chop the kick to pad 1, the snare to pad 2 and the hat to pad 3 in one go. Your loop isn’t touched. The hits are saved as WAV files in Documents\UndoLooper\Pad Slices, so they’re still there next time.
SLICE shortcuts: Space previews, Enter sets the loop, Esc cancels, and double-clicking zooms to your selection. The looper’s own controls pause while the panel is open.
Verse, chorus, drop: arranging with undo
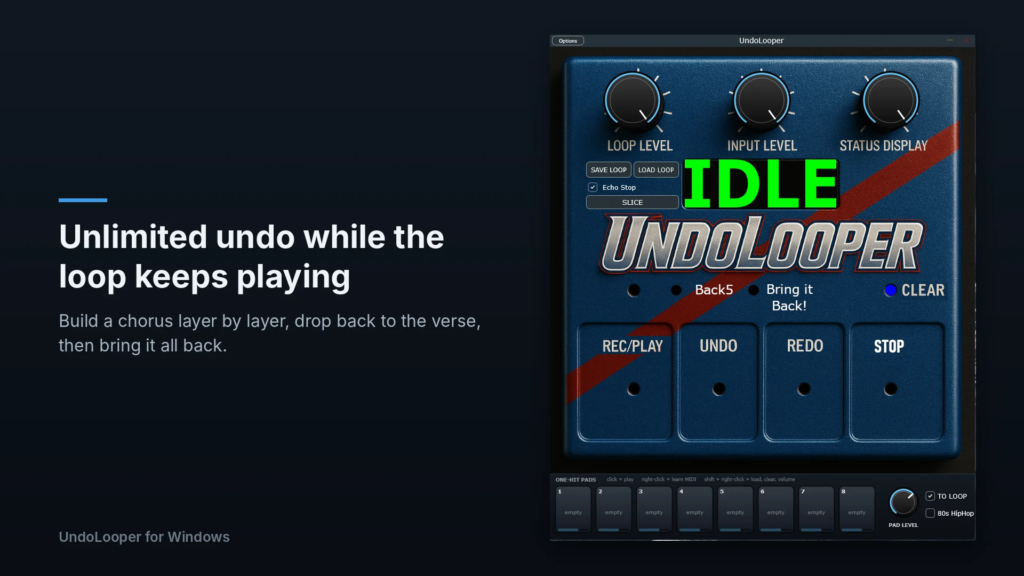
This is what UndoLooper is built for. Undo and redo don’t stop the music, so you can use them to arrange a whole song live.
- Build the chorus. Layer everything: drums, bass, chords, the hook, harmonies.
- Drop to the verse. Press UNDO a few times until you’re down to the drums and bass. Or press Back5 to take off five layers at once.
- Play the verse over the stripped-down loop.
- Bring the chorus back. Press Bring it Back! and every layer slams back in at once. For a build instead of a slam, press REDO one layer at a time.
One rule to remember: if you record a new layer while some layers are undone, those undone layers are gone for good. So do your drop and your Bring it Back first, and record new parts once everything you want is back in.
For beat makers, the same move gives you a breakdown and a drop. Build the full beat, press Back5 to strip it to the kick and bass, let the crowd wait a bar or two, then Bring it Back.
When the song’s over, tap STOP with Echo Stop ticked and the loop fades out with a short echo instead of chopping off.
Hands-free: foot controllers and keys
The four footswitches, Back5, Bring it Back!, CLEAR and all eight pads can be played from a MIDI foot controller, and in the standalone app from your computer keyboard.
- Right-click the button you want to map, for example REC/PLAY. The display says LEARN.
- Press the switch on your controller. Notes and CCs both work. In the standalone app you can press a computer key instead.
- The display says LEARNED. Done.
Holding your mapped STOP switch for two seconds clears the loop, just like with the mouse. Your mappings are saved with your session.
A good starting layout: with four switches, use REC/PLAY, UNDO, REDO and STOP. With six, add Back5 and Bring it Back!
In a DAW: send your controller’s MIDI to the track UndoLooper is on, and keep the UndoLooper window open while you use your foot controller for the pedal switches. The pads respond even with the window closed.
Save, share and load
SAVE LOOP writes a single .undoloop file. It holds your audio plus every layer and your whole undo and redo history. Open it next week and you can still undo back to the verse and bring the chorus back.
Send .undoloop files to friends, bandmates or students. They open in UndoLooper on Windows, Mac and iPad, so someone can see exactly how you built your layers and jam along.
LOAD LOOP opens .undoloop files and regular audio files (WAV, MP3, AIFF, FLAC and OGG). You can also drag a file onto the UndoLooper window, and on Windows you can double-click an .undoloop file to open it in the app if you let the installer set that up.
Free and full version (Windows)
Free: everything in this manual, with loops up to 15 seconds. That fits four bars of 4/4 at any tempo above 64 BPM. Saving and Echo Stop are part of the full version. You can open .undoloop files, play them and undo and redo through them, but recording over them says DUB LOCKED.
Full ($59.99, good on two computers): loops up to 60 seconds, saving, Echo Stop, and recording over anything. Click BUY in the top left corner of UndoLooper. Once you’ve bought it, click UNLOCK, choose to activate online and sign in with the email you used to buy. The copy you already have becomes the full version. LICENSE then shows your license and lets you deactivate a computer if you get a new one.
When something’s not right
I can’t hear my mic or guitar. In the standalone app, open Options and untick “Mute audio input.” Check that the right input channel is ticked and that INPUT LEVEL is turned up.
I hear myself twice, or a little echo. Your interface’s direct monitoring and UndoLooper are both playing your live sound. Turn one of them off. In a DAW, don’t monitor a dry copy of the track as well.
It feels late. Switch to your interface’s ASIO driver and set the buffer to 64 or 128 samples.
I hear crackles. Raise the buffer size one step at a time until they stop.
The loop bumps at the end. The closing press of REC/PLAY was early or late. Try again right on beat one, or tidy it up in SLICE with Snap to zero crossings ticked.
My foot controller does nothing. In the standalone app, tick it under Active MIDI inputs in Options. In a DAW, make sure its MIDI reaches the UndoLooper track and the UndoLooper window is open. Then map the switch again.
The display says DUB LOCKED or 15 SEC MAX. Those are the free version’s limits. See Free and full version.
Still stuck? Email [email protected] with your Windows version, your audio interface, and whether you’re using the app or the plugin.
Cheat sheet
| Control | What it does |
|---|---|
| REC/PLAY | Record, close the loop, add a layer, finish the layer |
| UNDO | Take off the last layer (or throw away the layer you’re recording) |
| REDO | Put the last undone layer back |
| STOP | Tap to stop, hold two seconds to clear |
| Back5 | Take off five layers at once |
| Bring it Back! | Put back every layer you took off |
| CLEAR | Wipe the loop and its history |
| Right-click any button or pad | Map it to a MIDI switch or a computer key |
| Shift + right-click a pad | Load, clear, unmap or set the pad’s volume |
| Mouse wheel over a pad | Pad volume |
What the display is telling you
| Display | Meaning |
|---|---|
| IDLE | Ready, nothing recorded yet |
| REC | Recording your first pass |
| PLAY | The loop is playing |
| DUB | Recording a new layer on top |
| UNDO / REDO | A layer came off or went back on |
| BACK 5 | Up to five layers came off |
| ALL BACK | Every undone layer is back |
| NO UNDO / NO REDO | Nothing left to undo or redo |
| STOPPED | The loop is stopped. Press REC/PLAY to play it again |
| CLEARED | Everything wiped, ready for a fresh loop |
| LEARN / LEARNED | Waiting for a switch or key / mapping saved |
| SAVED / LOADED | Your loop file was saved or opened |
| NO LOOP | There’s nothing to save yet |
| 15 SEC MAX | The free version’s loop length was reached, so the loop closed itself |
| DUB LOCKED | The free version can’t record over this loop |
Have fun with it. If you make something you’re proud of, save it as an .undoloop and send it our way at [email protected]. We’d love to hear it.